Pipelines#
Pipelines are an interactive tool for creating and experimenting with your data workflow in Orchest.
A Pipeline is made up of Steps and connections:
Steps are executable files that run in their own isolated Environments.
Connections link steps together to define how data flows (see data passing) and the order of Step execution.
Pipelines are edited visually and stored in JSON format in the pipeline definition file. This allows Pipeline changes (e.g. adding a step) to be versioned.
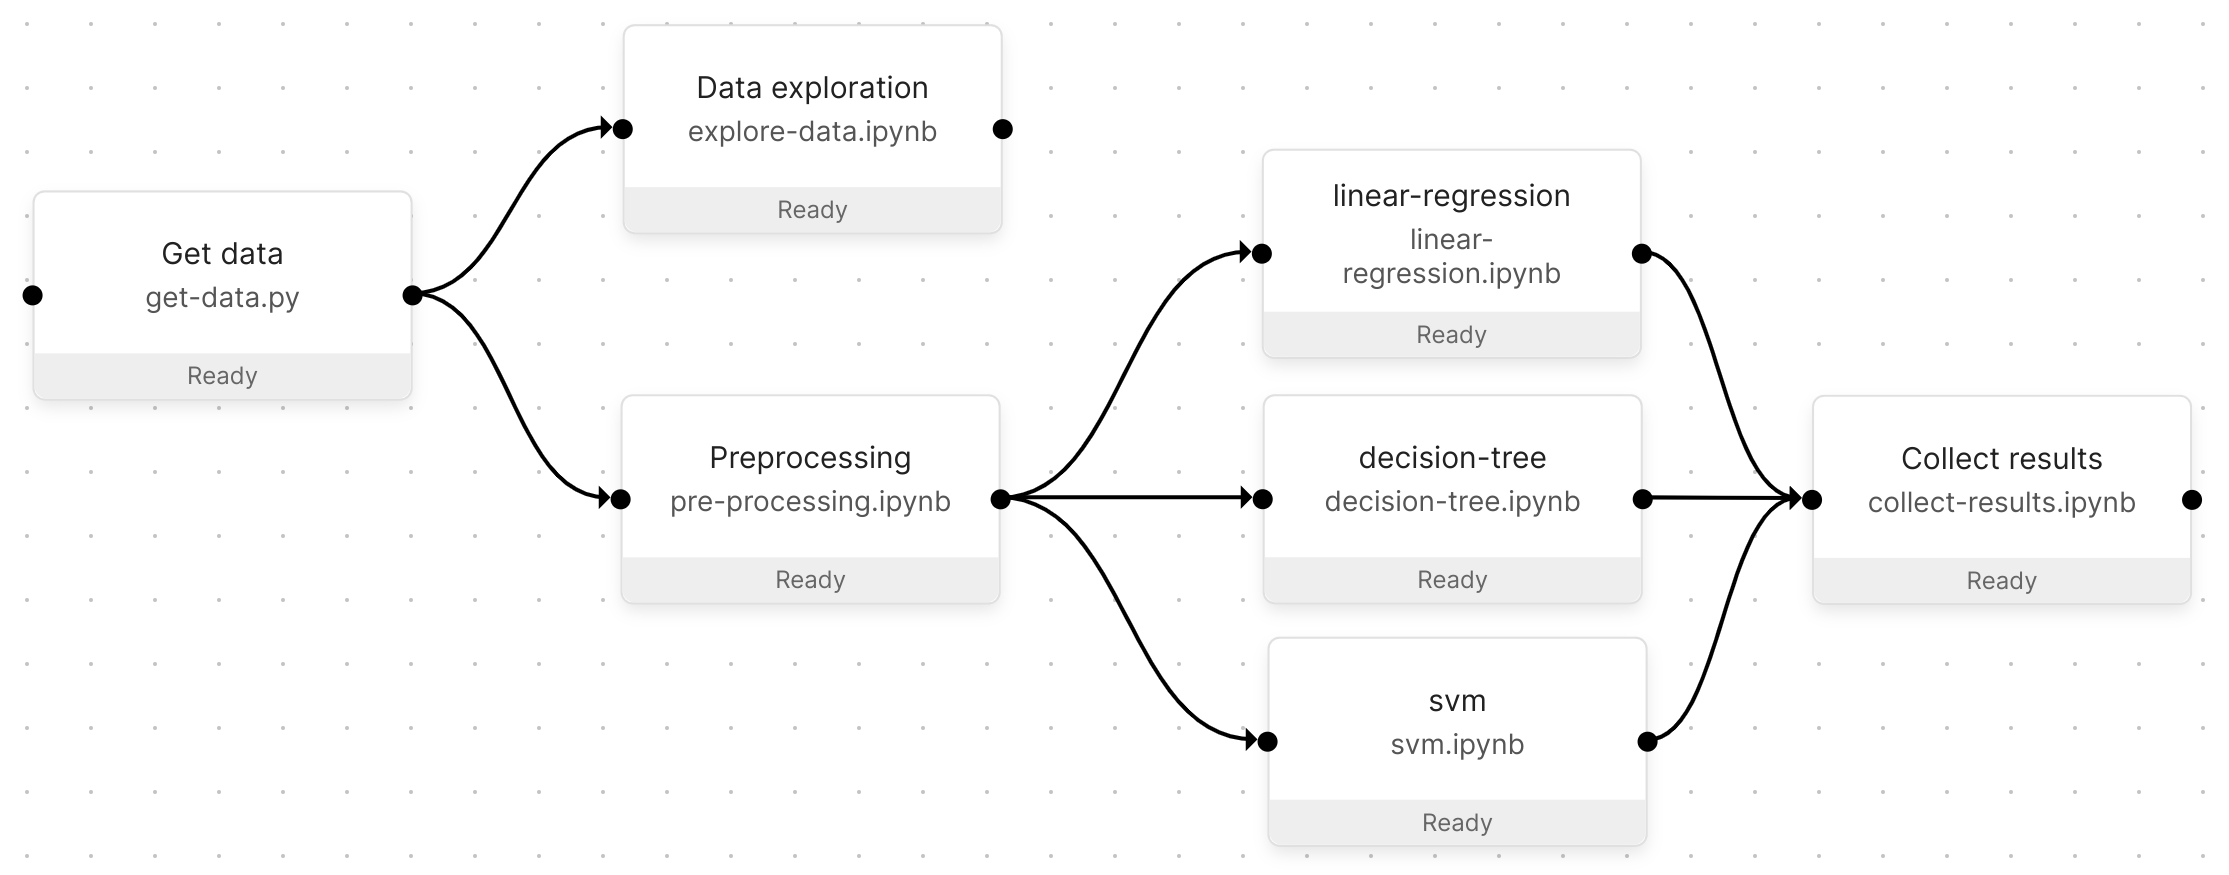
The quickstart Pipeline.#
Tip
👉 Check out the creating a Pipeline from scratch video to learn how to create a pipeline in the visual editor.
Running a Pipeline in Orchest#
Once set up, you can run your Pipeline in Orchest in two ways:
Interactive runs inside the Pipeline editor.
Job runs (see job).
Interactive runs are a great way to rapidly prototype your Pipeline. When using Jupyter Notebook
.ipynb files, Pipeline Steps are actively changed as if running individual cells in JupyterLab.
The output of Pipeline Steps is stored when you run a step as part of a session.
This lets you run just the parts of the Pipeline that you’re working on rather than all of it.
You can access these outputs directly from within the JupyterLab kernel for notebook based Steps.
Parameterizing Pipelines#
Pipelines take parameters as input (e.g. the data source connection URL) to vary their behaviour. Jobs can use different parameters to iterate through multiple runs of the same Pipeline. Parameters can be set in the visual pipeline editor.
You can define Pipeline parameters at two levels:
Pipelines: The parameters and their values will be available across every Pipeline step.
Pipeline steps: The parameters will only be available in which they are defined.
Editing Pipeline parameters#
Open a Pipeline via the Pipelines option in the left menu pane.
Click on SETTINGS in the top right corner.
Towards the top you will find the Pipeline parameters section.
Input some JSON like
{"my-param": <param-value>}.Make sure to Save at the bottom of your screen.
Editing Pipeline step parameters#
Open a Pipeline via the Pipelines option in the navigation bar.
Click on a Pipeline Step to open its Properties.
Towards the bottom you will find the Parameters section.
Input some JSON like
{"my-param": <param-value>}.
Interacting with parameters through code#
After you have set parameters for your Pipeline and/or steps you can use their values inside your scripts (see parameters API reference).
Let’s say you have set the following parameters on your Pipeline:
{
  "vegetable": "carrot",
  "fruit": "banana"
}
And for your Pipeline Step:
{
  "candy": "chocolate",
  "fruit": "apple"
}
Then inside the Pipeline Step you can access the parameters as follows:
import orchest

# Get the parameters of the current step and the Pipeline.
fruit = orchest.get_step_param("fruit")               # "apple"
vegetable = orchest.get_Pipeline_param("vegetable")   # "carrot"
Tip
👉 For secrets, use environment variables since parameters are versioned.
Defining a JSON schema for Step parameters#

An example schema for Step parameters in Orchest.#
You can define a JSON schema of the parameters to streamline the process of editing parameters. We integrated the open-source project JsonForms that allows you to define the types of the parameters. JsonForms renders the UI form based on the JSON schema, so that you can choose to change the value of the parameters by interacting with a UI instead of editing it in the JSON editor using JSON syntax. JsonForms provides various examples that you can use to find the most suitable options for your parameters. This feature works at the Pipeline step and Pipeline level.
Go to the Parameters section of a Pipeline step.
Find the toggle JSON / FORM. Click on FORM.
Click on NEW SCHEMA FILE, and it will create a JSON schema file for you and open it in JupyterLab.
Right click on the JSON file, select Open With > Editor.
Define the schema of the parameters, see the examples from JsonForms
Save the JSON schema file.
Go back to Visual Pipeline Editor, find the Parameters section of the step you were editing.
[Optional] Toggle FORM, in case it was set to JSON.
Start editing parameters using the UI form.
JsonForms has default UI components per data type, e.g. a TextField for string. In case you need more sophisticated layouts or controls, you can create a UI schema file to achieve this (see JsonForms docs).
Go to the Parameters section of a Pipeline step.
Open the More Options menu in the corner.
Select New UI schema file, and it will create a JSON schema file for you and open it in JupyterLab.
Define the UI schema corresponding to the schema you defined earlier.
Go back to Visual Pipeline Editor, find the Parameters section of the step you were editing.
[optional] Toggle FORM, in case it was set to JSON.
Check if the UI form is updated based on your UI schema.
The JSON schema files are sidecar files of the given step file. The schema files will be picked up
if they are in the same folder and follow the correct naming convention. For example, given a step
file of which file path is source/get-data.py, the schema file path would be
source/get-data.py.schema.json and the UI schema file path would be
source/get-data.py.uischema.json.
The same mechanism also applies to Pipeline parameters. You can create the schema files at the Pipeline level.
Open a Pipeline via the Pipelines option in the left menu pane.
Click on SETTINGS in the top right corner.
Towards the top you will find the Pipeline parameters section.
Create schema files for the Pipeline with the same steps as for pipeline steps.
Likewise, the schema files should be placed to the Pipeline .orchest file, e.g.
california_housing.orchest.schema.json and california_housing.orchest.uischema.json. This means
that you can also create these schema files yourself through the file system without the Visual
Pipeline Editor.
Data passing#
Pipelines can pass data between steps. For example, to define an ETL pipeline in Orchest, you can pass data between the individual extract, transform and load Steps.
Data is passed using the Orchest SDK:
import orchest
# Get data from incoming steps.
input_data = orchest.get_inputs()
# Some code that transforms the `input_data`.
res = ...
# Output the data.
orchest.output(res, name="transformed-data")
See more in data passing.
Storing data locally#
Pipeline Steps can read and write from and to the /data directory, which is accessible by all
Pipelines across all projects. For example:
# Get a text file from some external source.
txt_data = ...

with open("/data/nltk_example_text.txt", "w") as f:
    f.write(txt_data)